+2712 88 00 258
Sage X3 Tip & Trick – How to create an Excel report that extracts Sage X3 data directly from the SQL database based on selected parameters.

Step 1 – Create a SQL user and password. The user should only have reading/viewing rights. This user will be used to extract the data into Excel.
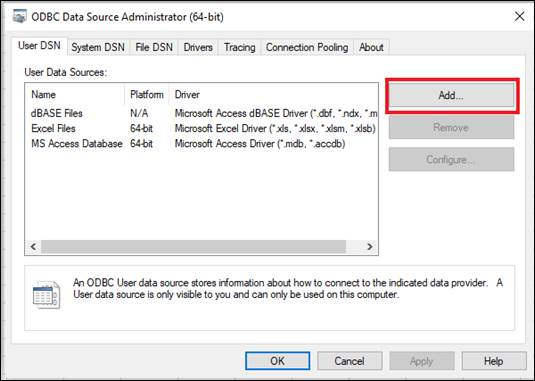
Step 2 – Now that the user is created, you need to setup the ODBC Data Sources (64-bit) on your local machine to allow the data extract.
2.1) Search for ODBC Data Sources (64-bit) from the start menu
2.2) Once open, click on [Add..] to add a new source
Step 3 – Scroll down and double-click on “SQL Server”

Step 4 – Give it a name and paste the SQL Server that you are going to extract the data from.
4.1) Then click on [Next]

Step 5 – Check the “With SQL Server authentication…” checkbox
5.1) Enter the logins for the generic user that we created in Step 1
5.1.1) Login ID: ????
5.1.2) Password: ????
5.1.3) Click on [Next]

Step 6 – Don’t change anything, click on [Next]

Step 7 – Don’t change anything, click on [Finish]

Step 8 – Click on [Test Data Source] to test if the connection is successful.

Step 9 – Once it’s confirmed that the connection is successful, click on [OK] and click on [OK] again.


Step 10 – You will return to the first window and now you should see the new data source that you have just added to the list.
10.1) Click on [OK]

Step 11 – Now open your Excel file, on the [DATA] tab
11.1) Click on the [From Other Source] icon
11.2) Select “From Microsoft query”
11.3) Select the Data source that you previously created.

Step 12 – Enter the login and password for the SQL user that was used to setup the ODBC data source.

12.1) The Query wizard will open. You have an option to extract data from the tables or close the wizard window and call data from a specific store procedure.
Step 13 – Select the area where you want to display the extracted data and click “OK”

13.1) The data will be extracted to the selected area and every time you refresh the file, based on your entered parameters, the values will be updated.
