+2712 88 00 258
KB20230807/01: Sage X3 Tip & Trick – How to create a workflow that will automatically email an invoice to a customer.

Sage X3 has a number of add-ons that you can take advantage of to streamline emailing your documents to your customers, such as EDD (Electronic Document Distribution), EDM (Electronic Document Management) and PIA (Purchase Invoice Automation). But in standard Sage X3, a workflow can be setup to email a single document like a Sales Order Invoice to a customer automatically.
Follow the steps below on how to create such a workflow. Please note – Before following the steps please make sure that the appropriate email settings are setup for workflows.
Setup a workflow based on the APRINT workflow, but to print a specific report.
Step 1 – Open Setup, General parameters, Parameter values.
Step 2 – Expand SUP chapter and click on Action button for the WRK Group.
Step 3 – Verify that you have an email server entered for parameter SERMES.
Step 4 – Click OK.
Step 5 – Click on Action button for RPT Group.
Step 6 – Verify that ASAIDEST parameter is set to No.
Step 7 – Open Setup, Workflow, Workflow rules.
Step 8 – Select APRINT workflow.
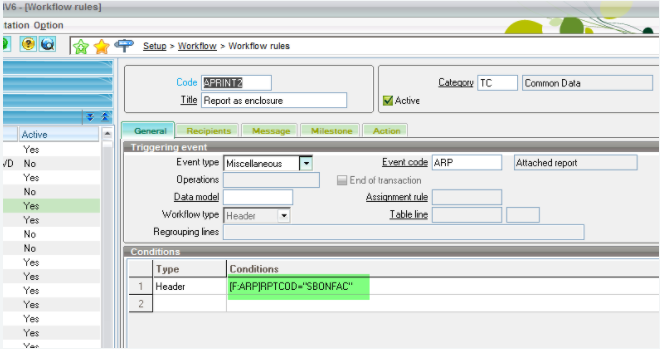
Step 9 – Create a new workflow by changing APRINT name to a new name.
Step 10 – Set the condition on the header to only run when using your report, for example, [F:ARP]RPTCOD=”SBONFAC”.
Please note – You may also want to either deactivate APRINT or add [F:ARP]RPTCOD<>”SBONFAC” so that only one workflow is triggered. Also, double check that you did not make a typing mistake. Typing mistakes will result that no error messages will be displayed to warn you. Emails will simply not generate.

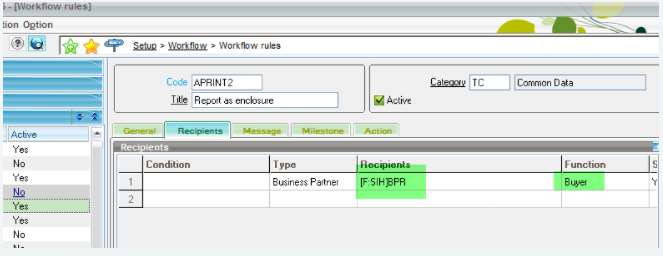
Step 11 – On the Recipients tab, select [F:SIH]BPR as the recipient and the appropriate function.
Please note – Double check again that you did not make a typing mistake.

Step 12 – On the Message tab, verify that GFILPATH is set under attached documents.
Step 13 – Click Save and Validate.
Step 14 – Open Common Data, Customers, Customers.
Step 15 – Select the customer you would like to email.
Step 16 – Click on Contacts tab and select the contact you would like the email to go to and set them to the same function as the workflow function (in this example, Buyer).
Step 17 – Open Sales, Invoices, Invoices.
Step 18 – Create a new invoice for the customer above.
Step 19 – Click Print to print the invoice.
Step 20 – Select SBONFAC report (this is the report we set as part of the workflow)
Step 21 – Choose output of Message.
Please note – You may also create destination that defaults to Message.
Step 22 – Click Print. If everything was set up correctly, you should receive a popup box showing you which email address the attachment will be send to. Click OK.
Please note – If you do not receive this popup box, you either made a typing mistake in one of the above sections, or you did not set up your email settings correctly.
Step 23 – Your customer will receive an email with the attached invoice.
